- Published
How to dynamically generate an og banner image for your next.js app
In the vast ocean of the internet, where websites compete for attention like colorful fish in a coral reef, it's essential to make a splash with captivating visuals. Imagine sharing your website link on social media and having it stand out like among a flock of plain pigeons.
If you already use Next.js or wish to test it, bear with me.
Next.js comes to the rescue with its ability to dynamically generate visually stunning OG banner images. Forget about boring, static thumbnails—here, we're all about creating dazzling, eye-catching banners that leave a lasting impression. Whether you're promoting a blog post, a product page, or your pet rock's personal website (hey, we don't judge), we've got you covered.
1. Create your base design
So first, we need to design a template that we will use later. For this, we will use Figma. If you don't have an account, you can create one for free. We're also using the real-life example I used for this blog post: , a directory of open-source contributors we've built with .

I hope you like my artistic talent
I now know what I will need to develop later on:
- a static background image,
- a static title,
- a dynamic username,
- a dynamic avatar,
- a dynamic description.
2. Install @vercel/og
In Next.js, you will need to use the @vercel/og. In our blog, we can leverage @vercel/og to achieve the following:
- Create an API route handler (/api/og) that accepts query parameters for dynamic image generation, such as /api/og?title=My First Blog Post.
- Inside the API route handler, define a JSX-like syntax to generate images instead of HTML markup.
- In production, each generated image is cached at the edge, ensuring quick retrieval for subsequent requests (/api/og?title=My First Blog Post).
With @vercel/og, we unlock the ability to dynamically generate and cache stunning images, adding an extra touch of creativity and speed to our blog.
Enable your team to mergepull requests faster with Axolo
3. Create your og.tsx file
Now that we have our design, we can start coding our og image. We will create a file called og.tsx in the pages/api folder. This file will be used to generate our og image.
import { ImageResponse } from "@vercel/og"
import { NextRequest } from "next/server"

export const config = {
  runtime: "edge",
}

export default function handler(request: NextRequest) {
  try {
    const { searchParams } = new URL(request.url)

    // ?title=<title>
    const hasTitle = searchParams.has("title")
    const title = hasTitle ? searchParams.get("title")?.slice(0, 100) : "My default title"

    return new ImageResponse(
      (
        <div
          style={{
            backgroundColor: "black",
            backgroundSize: "150px 150px",
            height: "100%",
            width: "100%",
            display: "flex",
            textAlign: "center",
            alignItems: "center",
            justifyContent: "center",
            flexDirection: "column",
            flexWrap: "nowrap",
          }}
        >
          <div
            style={{
              display: "flex",
              alignItems: "center",
              justifyContent: "center",
              justifyItems: "center",
            }}
          >
            <img
              alt="Vercel"
              height={200}
              src="data:image/svg+xml,%3Csvg width='116' height='100' fill='white' xmlns='http://www.w3.org/2000/svg'%3E%3Cpath d='M57.5 0L115 100H0L57.5 0z' /%3E%3C/svg%3E"
              style={{ margin: "0 30px" }}
              width={232}
            />
          </div>
          <div
            style={{
              fontSize: 60,
              fontStyle: "normal",
              letterSpacing: "-0.025em",
              color: "white",
              marginTop: 30,
              padding: "0 120px",
              lineHeight: 1.4,
              whiteSpace: "pre-wrap",
            }}
          >
            {title}
          </div>
        </div>
      ),
      {
        width: 1200,
        height: 630,
      }
    )
  } catch (e: any) {
    console.log(`${e.message}`)
    return new Response(`Failed to generate the image`, {
      status: 500,
    })
  }
}
4. Add the og image url to your page
If you're here, I guess it's because you used the powerful function getStaticProps & getStaticPaths to generate your pages. If not, you can read the Next.js documentation to learn more about it.
So start by opening your [page].js file (you should have another name).
We will now dynamically create the og image url. In my project, this is what it looked like:
const ogUrl = new URL(`${URLFRONT}/contributors/api/og`)
ogUrl.searchParams.append("username", dev.username)
ogUrl.searchParams.append("avatarUrl", dev.profile?.avatarGitHub)
ogUrl.searchParams.append("bio", dev.profile?.bio)
You can see that I created my url with the URL object. Then I added my query parameters with the searchParams object.
Now the last thing we need to do here is to add this as a meta property in our page. It will either be a html meta tag or a react meta tag depending on your project.
  <Head>
    {...}
    <meta property="og:image" content={ogUrl.toString()} />
  </Head>
5. Code your og image with dynamic data
Let's go back to your og.tsx file. Do you see the searchParams object? We will use it to retrieve the data we need to generate our og image.
Instead of a title, I gave three other parameters, so in my project it looked like this:
const avatarUrl = searchParams.get("avatarUrl")
const username = searchParams.get("username")
const bio = searchParams.get("bio")
Congrats! You now have all the information required to develop your og image.
Developing your og image is a bit difficult, I recommend you test the Vercel playground to see how it works.
If you have something you like in the playground or wish to code directly in your editor, open locally one of your dynamically created pages, and look for the og image meta property, it looked like this for me:
https://axolo.co/contributors/api/og?username=donnemartin&avatarUrl=https%3A%2F%2Favatars.githubusercontent.com%2Fu%2F5458997%3Fv%3D4&bio=Tech+Lead+%40facebook
Initially, you should see the default Vercel image I gave you in Step 3. Now, it's your turn to develop your image! Refresh this link until you're satisfied with the result.
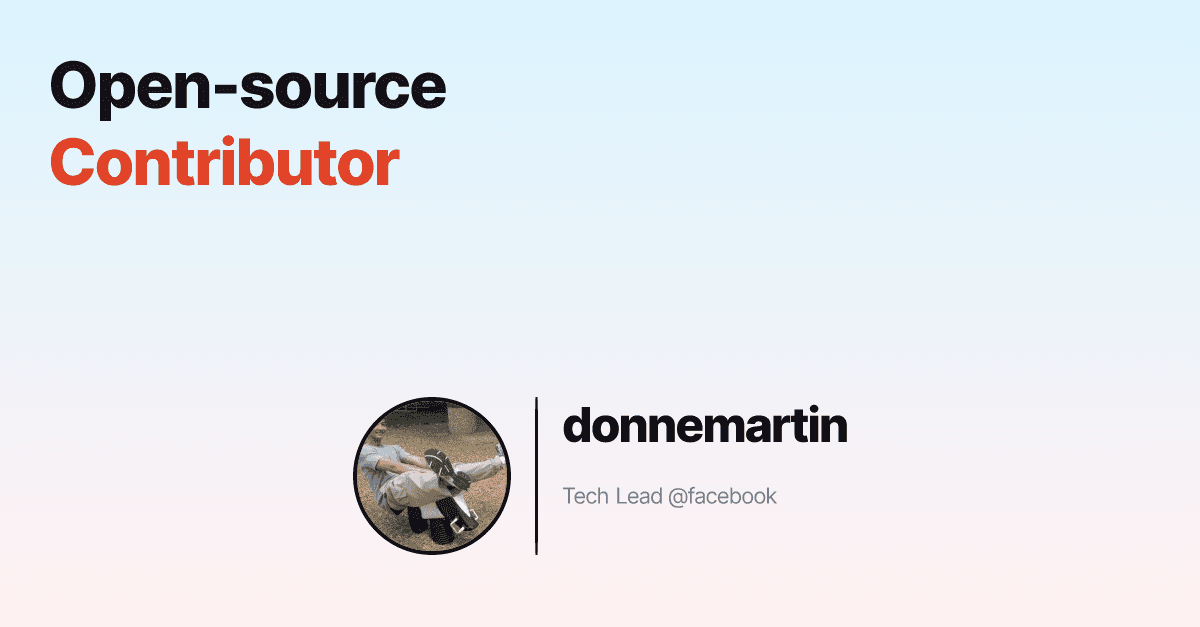
Yes, it's a bit different from my template but I'm happy with it
Axolo is a Slack app to help techteams review pull request seamlessly
6. Deploy your project
Now that you have your og image, you need to deploy your project. If you're using Vercel, you can deploy it directly from your git repository.
I hope you've enjoyed this tutorial, if you have any questions, feel free to contact me!