- Published
How to create your first GitHub bot to send notifications in Slack
GitHub bots, sometimes referred to as GitHub Apps, are essentially bots that support the software development process on GitHub. These apps are first-class actors, so they can do just about any task on GitHub - sadly, they won't write code for you (yet).
In this article, we will explain how to create a GitHub bot without using any specific language (you should be able to do it even if you work in Java, who knows?) and using the Probot framework on Node.js. But first, we need to create (or use an existing) Slack app. If you have already your Slack app ready, you can jump to the webhook part.
If you want to develop and maintain your own Slack bots, this is the right place! But if you prefer to use a turnkey solution, you should take a look at !
Table of Contents
- Creation of your Slack app
- Basic Slack settings creation
- Create your first incoming webhook URL
- Create your GitHub app
- Developing your GitHub app from scratch
- Creation of a GitHub app using the framework Node.js Probot
- Example of applications using Probot
- Setting up your Probot app
- Making your GitHub app
- Coding time
- Deploying the App
Creation of your Slack app
Basic Slack settings creation
Go to and select "Create New App".
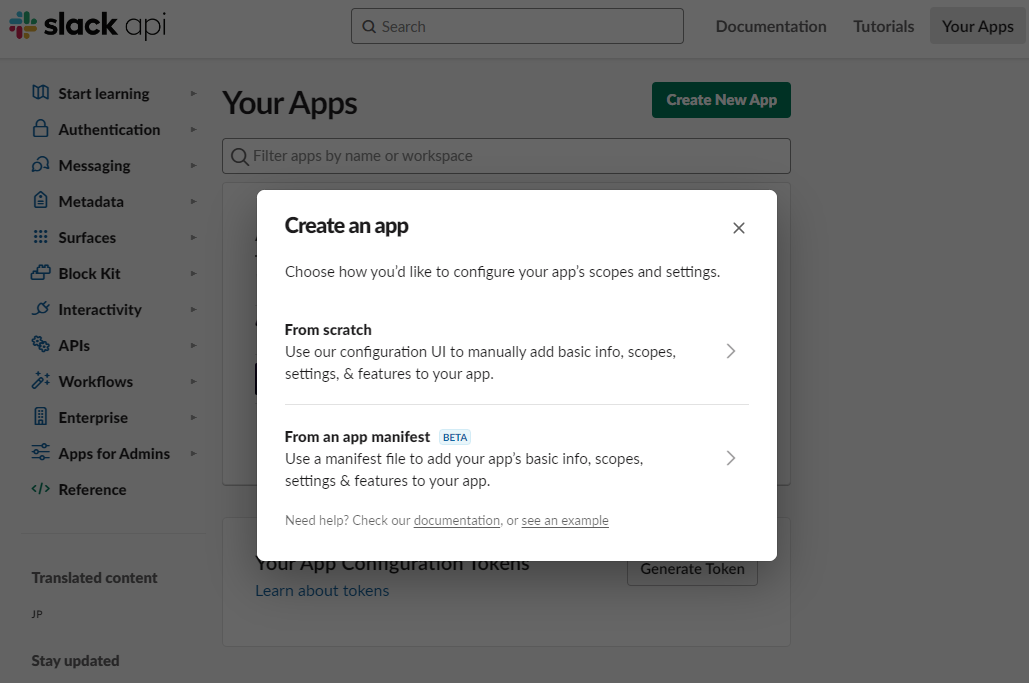
Then choose your App Name and pick your team workspace where your want to receive these GitHub notifications. I'll choose "PR bottleneck destroyer" for obvious reasons.
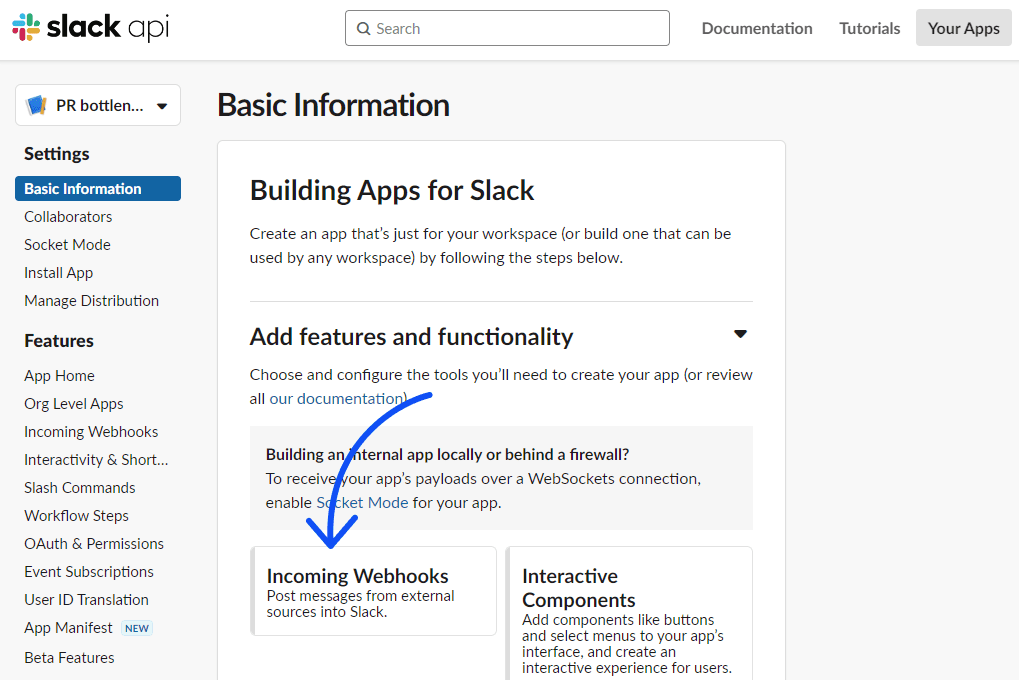
You should be redirected to your app page. Select "Incoming Webhooks" to continue.
Create your first incoming webhook URL
Then activate the incoming webhooks and add a new webhook to your workspace.
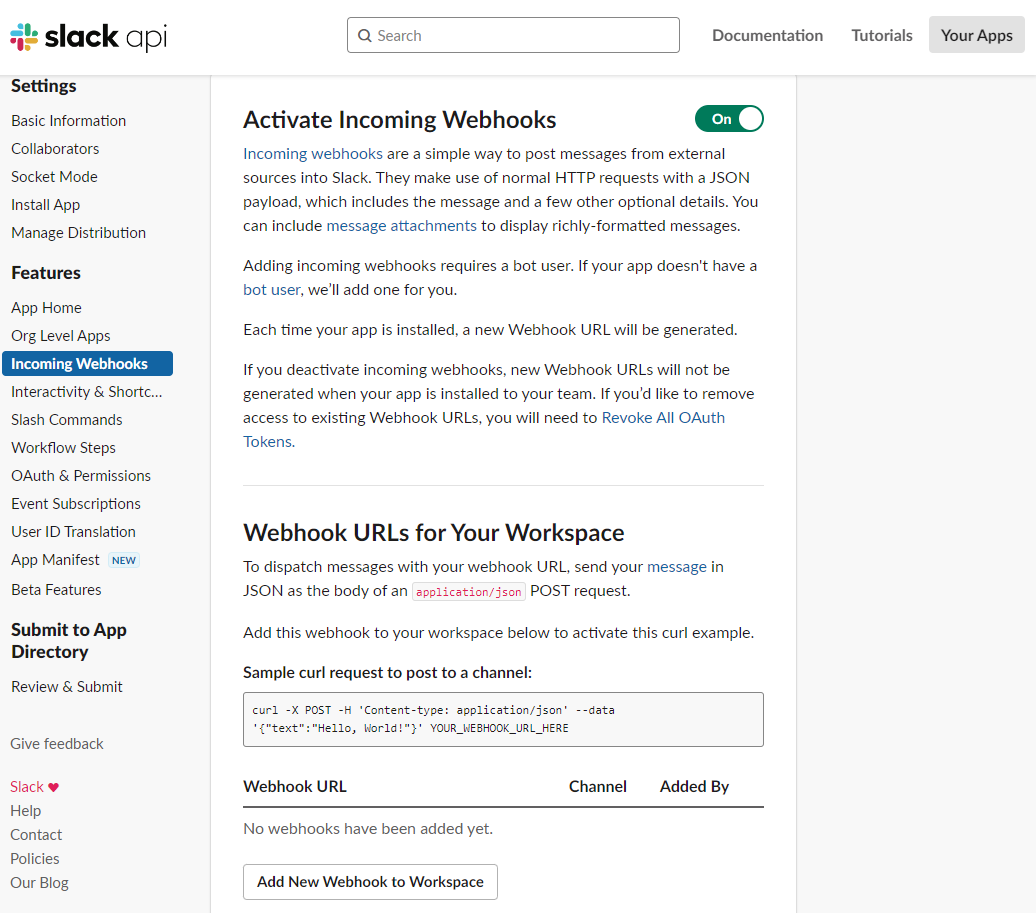
You should be able to select the channel where you want to receive the GitHub notifications and then find your new webhook URL.
Please be careful and keep this URL secret. Anyone with the URL will be able to send anything to this specific channel.
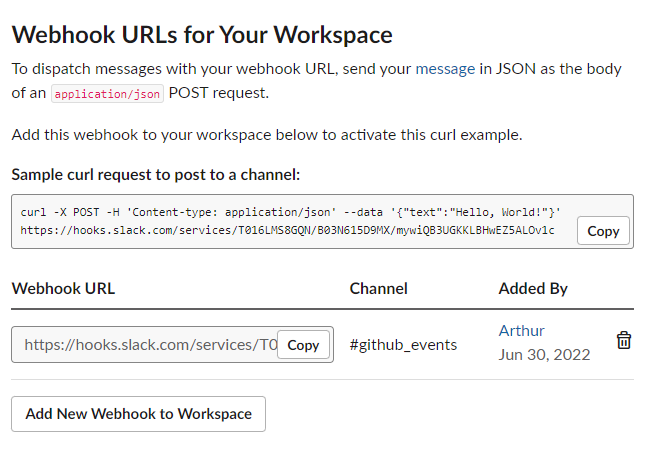
You can save this URL now or you will be able to find it here later.
Create your GitHub app
Developing your GitHub app from scratch
Create your GitHub app
To create your GitHub app from scratch, go to your organization settings. Under "Developer settings" (bottom left of your screen), click on GitHub Apps, and then "New GitHub App".
Now:
- Give your GitHub app a name,
- Put a random URL for your homepage URL as you probably won't display publicly this internal app,
- You can unselect the "Expire user authorization tokens" if you wish,
- If you already have an open route where you wish to receive GitHub webhooks, confirm that the webhook is active and fill the webhook URL. Else you should create a route on your application such as
https://my-application-api.com/GitHub/webhooksand fill this later on. - Select all the repository permissions you will need. For this workshop, we only need the "pull request" permissions,
- create your GitHub app.
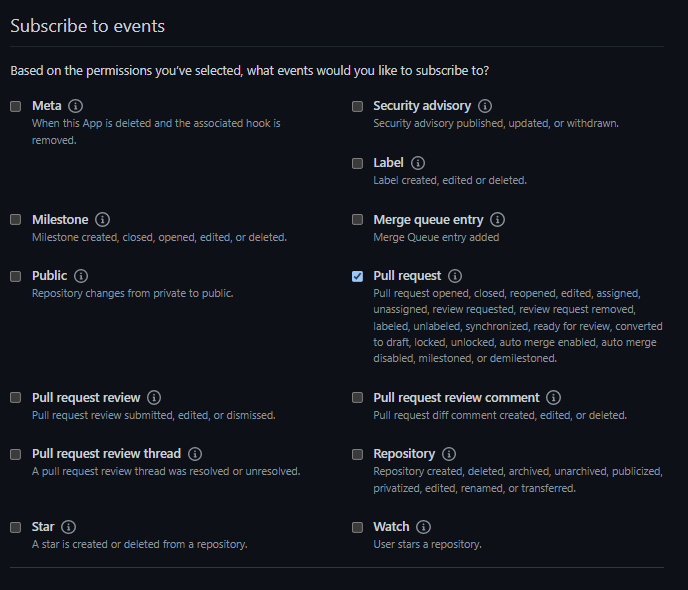
Subscribe to GitHub webhooks
Go on to the "Permissions & events" tab to select which webhooks you would like to receive. To react upon a review request, we will only need to subscribe to "Pull request" webhooks.
React upon incoming webhooks
Be sure to have your /GitHub/webhooks route open to external parties without authentication. For each action on a pull request, GitHub will now send a webhook there.
We now need to understand which webhook we receive to react appropriately. In Javascript, we can do the following in the controller receiving the webhook (I am using Strapi, an open-source headless CMS):
    const {
      body,
      body: { action },
    } = ctx.request;
    const event = get(ctx, 'request.headers.x-GitHub-event');
What are the event & action variables?
event: is the name of the permission. For this use case, we should only react upon'event' === 'pull_request'. (I personally use the get function from lodash to retrieve the event).action: is the name of the action of the webhook. For this use case, we should only react upon'action' === 'review_requested'.
The worst part is already behind us! Now that we know when to react, we only need to:
- Create your text for the Slack notification,
- Send your message to your Slack webhook URL.
Create your text for the Slack notification
We can find the information we need in the body we have received from GitHub. Under body.pull_request, we have:
- the name of the PR,
- the number of the PR,
- the html_url of the PR,
- the names of the requested reviewers (under body.pull_request.requested_reviewers).
In Javascript, my code looks like this:
// create your notification text
const pullRequestSlackLink = `<https://GitHub.com/${organization.login}/${repository.name}/${pullRequest.number}|PR ${pullRequest.number}`
// this return a nice list of GitHub login
const formatter = new Intl.ListFormat('en', { style: 'long', type: 'conjunction' });
const requestedReviewersLogins = formatter.format(pullRequest.requestedReviewers.map((engineer) => engineer.login));
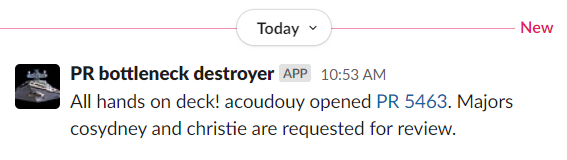
const text = `All hands on deck! ${sender.login} opened ${pullRequestLink}. Majors ${requestedReviewersLogins} are requested for review.
await axios.post(YOUR_WEBHOOK_URL, {
text,
});
Creation of a GitHub app using the framework Node.js Probot
Probot is a framework for creating GitHub Apps in Node.js and may be found at TODO . It handles obtaining and verifying webhooks. We can keep an eye out for changes in the GitHub status and take appropriate action when necessary.
A Node.js module that exports a function is all that a Probot app is:
//index.js
module.exports = robot => {
// robot is an Express App
// our code here
}
The robot parameter is an instance of the Application and gives us access to all of the GitHub power.
module.exports = robot => {
robot.on('issues.opened', async context => {
// A new issue was opened, what should we do with it?
})
}
When something interesting occurs on GitHub that our app wishes to be informed about, the robot.on will keep an eye out for any webhook events produced by GitHub and tell us of them.
Example of applications using Probot
Applications made with Probot:
- Stale – A GitHub app to close stale issues and PRs.
- Welcome – A GitHub app to welcome new contributors
- Reminders – Set a reminder on issues and PRs
- imgbot – An app to optimize images on GitHub
- circleci – An app for continuous integration
Setting up your Probot app
First, go to the console. Step 2: Make a brand-new folder and give it a name of your choosing. Step 3: Access the freshly created folder. Step 4: Enter the command "npx create-probot-app app name" in the console to begin configuring your app. Step 5: At this point, respond to the setup-related questions. This configuration is quite straightforward:
This will ask a series of questions about our app, which should look something like this:
Let's create a Probot app!
? App name: my-first-GitHub-app
? Description of app: A GitHub Bot built with Probot.
? Author's full name:
? Author's email address:
? GitHub user or org name:
? Repository name: github-slack-bot
? Which template would you like to use? (Use arrow keys)
❯ basic-js
basic-ts (use this one for TypeScript support)
checks-js
git-data-js
deploy-js
Finished scaffolding files!

Installing dependencies. This may take a few minutes...

Successfully created my-first-GitHub-app.

Begin using your app with:
cd my-first-GitHub-app
npm start

View your app's README for more usage instructions.

Visit the Probot docs:
https://probot.GitHub.io/docs/

Get help from the community:
https://probot.GitHub.io/community/

Enjoy building your Probot app!
Here are the most important files we'll use today:
- .env: The environment variables required to run the project are stored in this file. It has: WEBHOOK_PROXY_URL, APP_ID, PRIVATE_KEY, WEBHOOK_SECRET
⚠ You should never make this file public.
- index.js: This is where the app starts.
Axolo is a Slack app to help techteams review pull request seamlessly
Making your GitHub app
What are we going to do? Send a notification to yourself when someone requests a review from you.
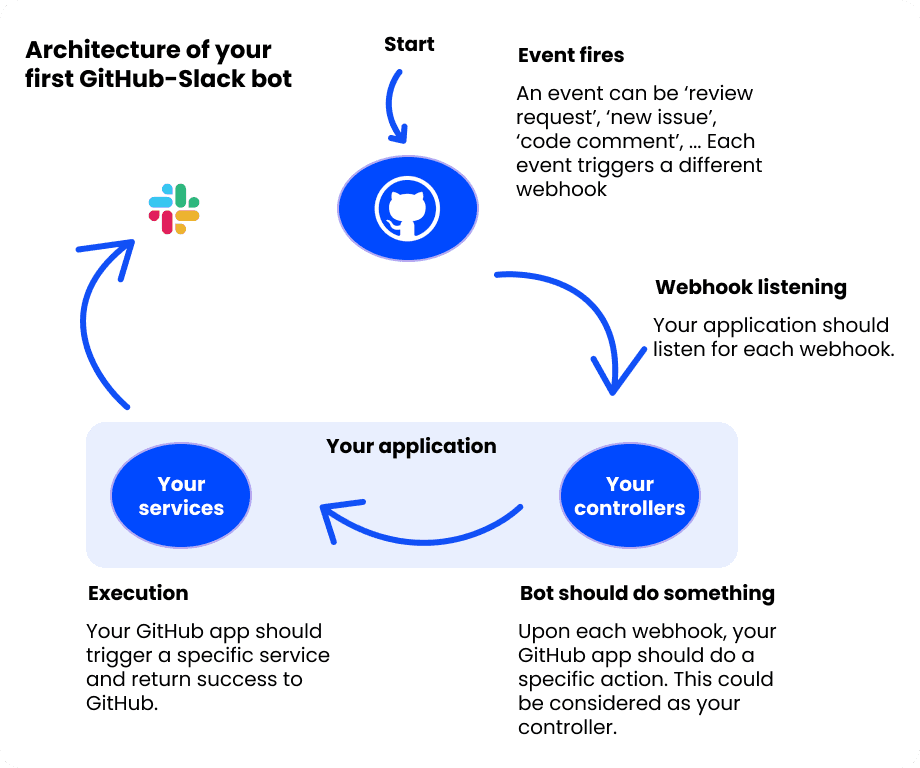
Architecture of your first GitHub-Slack bot
Giving app the right permissions
The app/bot needs the right permissions to respond to events that occurred on GitHub and perform as intended.
Go to , set the permissions, and save them to grant the app access. The owner of the repository must examine the permissions each time they are updated since they must be aware of these permission changes.
You should go to to review the modified permissions. Keep in mind that it must be changed to if the app is installed on a user's repo rather than a repo belonging to an organization.
Go ahead and "build up the basic app" by following the instructions in the section before looking at the code.
Initial code setup: Type "npm run dev" in the terminal to launch your app. Due to the initial setup of the probot app, you should have a simple codebase that is listening to the "issues.opened" event. Through that code, the bot comments on the issue thread in response.
Tip: Go to your app's "Advanced" settings to check the most recent events on GitHub that have been fired.
Play around with getting WebHooks from GitHub
You could imitate the same event when developing the app so that you can redeliver the same event while debugging code (which essentially means that GitHub is performing the event and then you can receive it and debug your app).
Coding time
So here is the example code to react upon a new review request:
module.exports = (robot) => {
  robot.on("pull_request.review_requested", async (context) => {
    const {
      body: {
      organization,
      repository,
      sender,
      pull_request: pullRequest
      }
      } = context.payload.pull_request;

  // create your notification text
  const pullRequestSlackLink = `<https://GitHub.com/${organization.login}/${repository.name}/${pullRequest.number}|PR ${pullRequest.number}`

  // this return a nice list of GitHub login
  const formatter = new Intl.ListFormat('en', { style: 'long', type: 'conjunction' });
  const requestedReviewersLogins = formatter.format(pullRequest.requestedReviewers.map((engineer) => engineer.login));

  const text = `All hands on deck! ${sender.login} opened ${pullRequestLink}. Majors ${requestedReviewersLogins} are requested for review.
 await axios.post(YOUR_WEBHOOK_URL, {
          text,
        });

  });
};
We start by deconstructing the body of the webhook in every variable we will need later. Then, we save the pull request link to make the last text variable easier to read. We use Intl list formatter to make a nice list of GitHub logins and then we only need to send our text to our saved webhook URL. I personally use axios but you're free to use your preferred tool!
Upon any review request, you should be able to see this message now:
Deploying the App
Setting environment variables
For official documentation, please visit the official Probot website. To set the env variables for this app, the following steps/actions were performed:
A ‘.env’ file should already exist, if it does not, create it.
In the .env file, set APP_ID to what you get from your GitHub application page.
The WEBHOOK_PROXY_URL should be the same you referred in your GitHub application.
The WEBHOOK_SECRET enables you to verfify the sender (which is GitHub).
A PRIVATE_KEY is required to verify the app.
You can set the LOG_LEVEL to 'json' to easily understand your logs. This is a optionnal feature. You should visite the Probot official page to learn more about logs.
And that's it! New review requests should now send notifications in your Slack workspace. If you have any questions, or some part has became outdated, please reach out to us.