GitHub Enterprise Server installation
1. Create an Axolo app in your GitHub Enterprise Server
Make sure you are an admin on the organization you want to install it on. Axolo doesn't support non-admin users for installation.
Axolo needs to be able to access your GitHub instance to fetch information about your projects. To do so, you need to create an Axolo app in your GitHub organization or personal settings. We recommend creating the app within your organization, that way anyone from your team will have access to it and no one from your security team will call you with questions you can avoid!
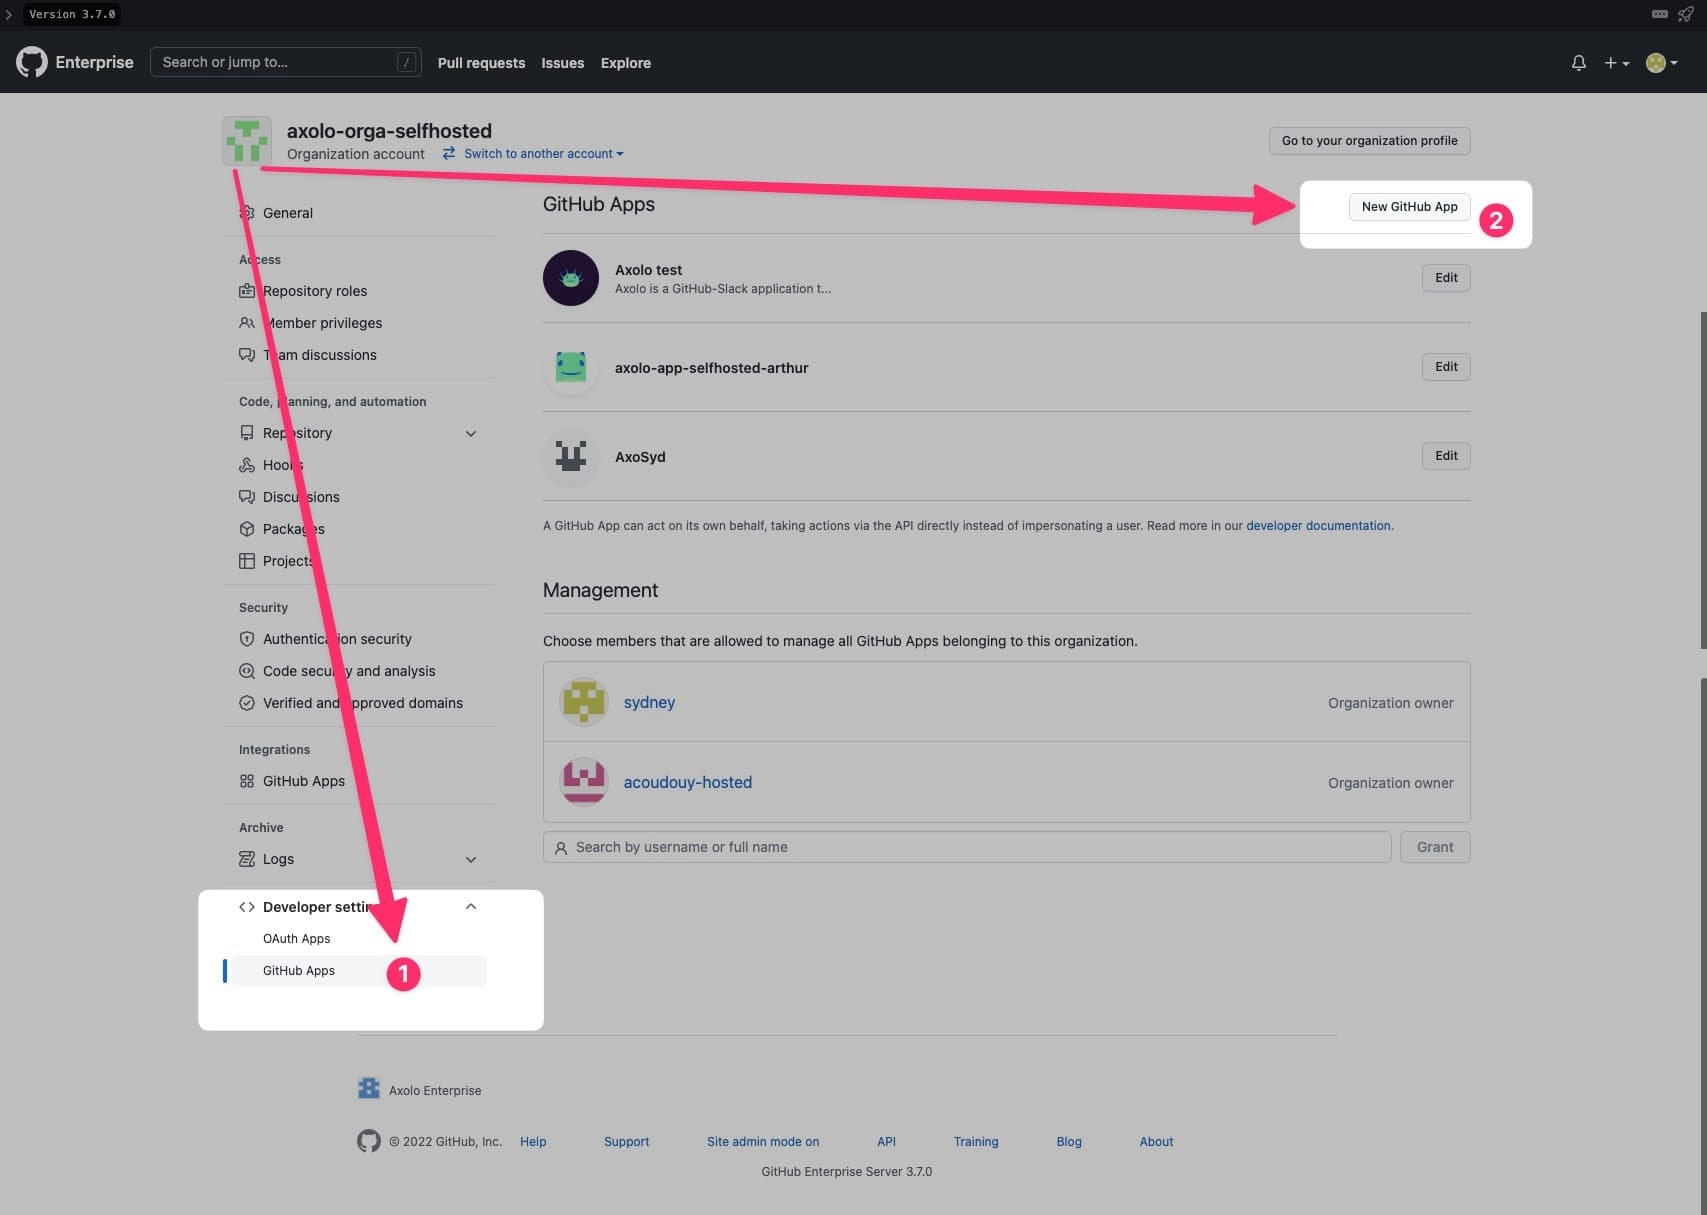
To do so, go on your organization settings, then click on the Developer settings tab, then GitHub Apps and finally New GitHub App.

-
Name:
Axolo -
Description:
Axolo is a GitHub-Slack application to help engineering teams merge pull requests faster. More info on https://axolo.co -
Homepage URL:
https://axolo.co
GitHub instances who are behing a VPN, or a firewall, will need to add the IP
address of the Axolo server to the list of allowed IPs.
Get in contact with us in the chat below for further information.
2. Add callback URLs
Under Identifying and authorizing users, add the two following callback URLs (you need to click on Add Callback URL to be able to add the second URL).
- https://app.axolo.co/auth/github/callback (opens in a new tab)
- https://api.axolo.co/player/auth/github/callback (opens in a new tab)
🔳 Expire user authorization tokens should not be checked.
✅ Request user authorization (OAuth) during installation should be checked.
3. Add Permissions to your app
Under Webhook, confirm that Active is checked, add the following URL:
https://api.axolo.co/github-connectsand confirm thatEnable SSL verificationis on.
We are almost done!
a. Under Repository permissions, select:
- Actions:
Read-only🔎 - Checks:
Read-only🔎 - Commit Statuses:
Read-only🔎 - Deployments:
Read-only🔎 - Discussions:
Read-only🔎 - Issues:
Read & write✒ - Metadata:
Read-only🔎 - Pull Requests:
Read & write✒
b. Under Organization permissions, select:
- Members:
Read-only🔎
c. Under User permissions, select:
- Email addresses:
Read-only🔎
4. Subscribe to webhooks
Under Subscribe to events, select:
- ✅ Check suite,
- ✅ Deployment status,
- ✅ Issue comment,
- ✅ Member,
- ✅ Membership,
- ✅ Organization,
- ✅ Pull request,
- ✅ Pull request review,
- ✅ Pull request review comment,
- ✅ Pull request review thread,
- ✅ Repository,
- ✅ Status,
- ✅ Team.
5. Generate a private key and finish onboarding
Last step, you should be invited to generate a private key and a Client Secret, please generate your private key and Client Secret and save them for later.
We recommend to upload our logo to the GitHub app, this will help you understand when Axolo is posting a message on your behalf. You can find our logo on this link and our background color is #28143c.
You can now go back to app.axolo.co and paste the following variables:
- Your domain URL (e.g. https://github.apple.com (opens in a new tab))
- Your GitHub App ID (e.g. an integer)
- Your GitHub Client ID (e.g. Iv1.f811cc0c67b69d7i)
- Your GitHub Client Secret (e.g. 7620fe0ad8e35dd6d9d5c18e6777dab6a7a2e409)
- Your GitHub Client Private Key (e.g. -----BEGIN RSA PRIVATE KEY-----)